
How to take northern lights video?
How to Take Video of the Northern Lights: A Complete Guide
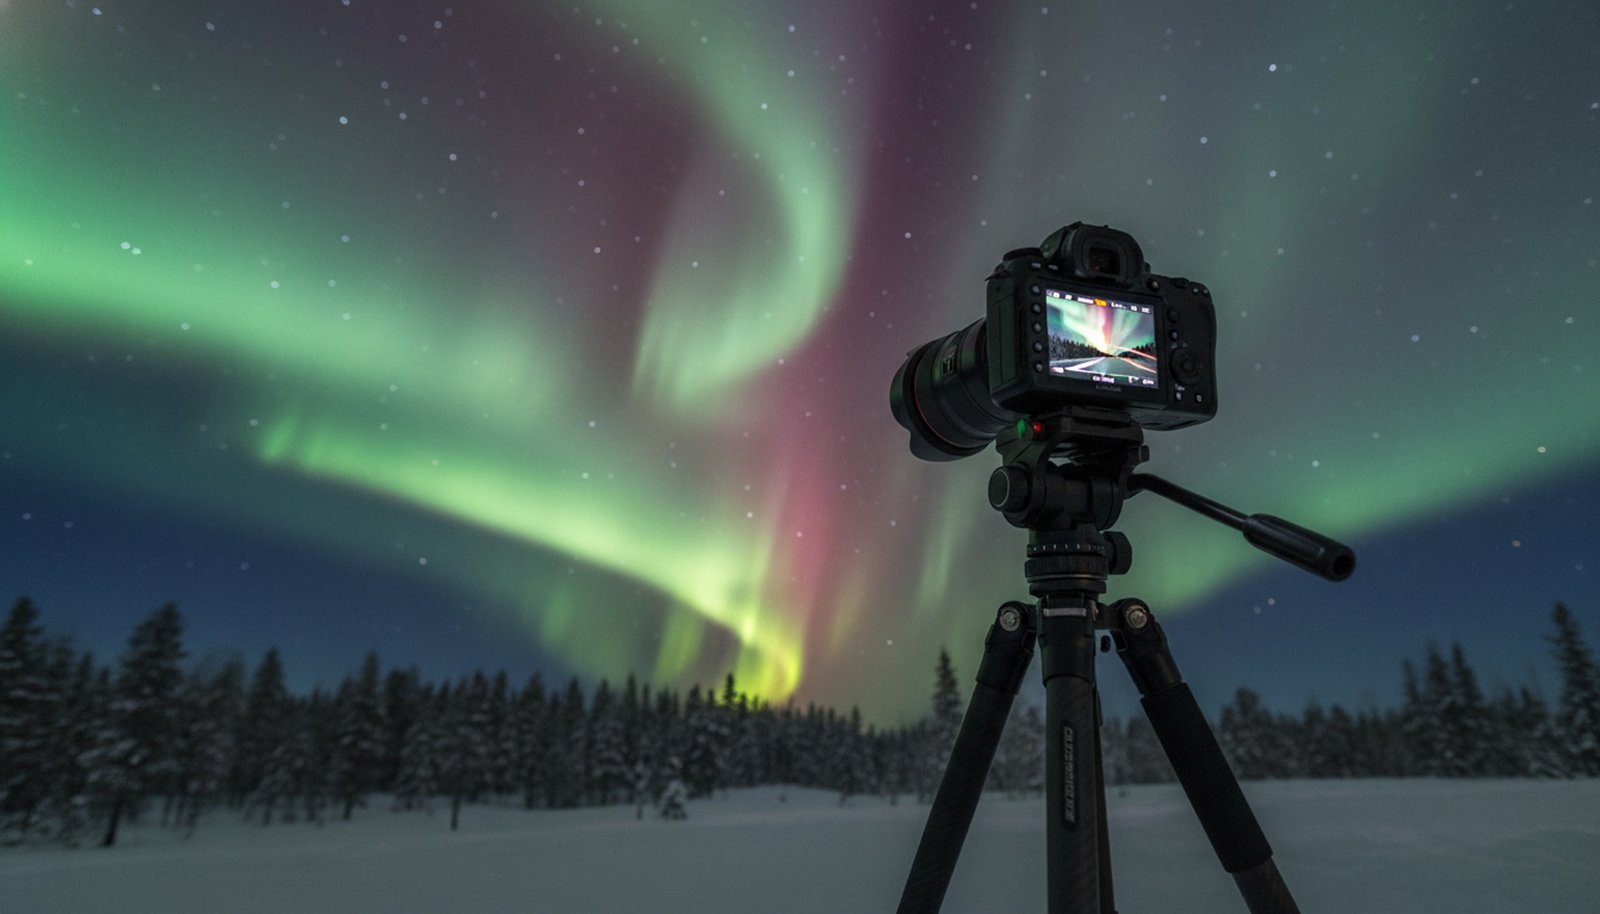
Capturing a photograph of the Northern Lights is one thing, but filming their ethereal, dancing motion in real-time video is a challenge that offers an incredible reward. While photographers often use long exposures to create static images, videography requires a different approach to capture the fluid movement without it becoming a blurry mess.
Fortunately, modern mirrorless and DSLR cameras have become so powerful in low-light situations that capturing high-quality aurora video is more accessible than ever. This guide will walk you through the essential gear, core settings, and techniques you need to create breathtaking footage of the world’s greatest light show.
Essential Gear for Aurora Videography
Having the right equipment is the foundation of successful aurora videography. While you don’t need the most expensive gear on the market, a few key items are non-negotiable for dealing with the dark and cold conditions.
The Right Camera
The ideal camera for aurora video has two main features: full manual control in video mode and excellent high-ISO performance. Modern mirrorless cameras are often preferred because their electronic viewfinders can brighten the scene, making it easier to compose your shot in the dark. A full-frame sensor will generally perform better in low light and produce cleaner footage at high ISOs than a crop-sensor (APS-C) camera, but many modern crop-sensor cameras are still very capable. The ability to shoot in a ‘Log’ profile or RAW video format is a significant bonus, as it provides much greater flexibility for color grading in post-production.
Lenses: Wide and Fast
Your lens choice is arguably more important than the camera body. You need a ‘fast’ lens, which means it has a very wide maximum aperture. Look for a lens with an aperture of f/2.8 or wider (e.g., f/1.8, f/1.4). A wider aperture allows more light to hit the camera’s sensor, which is critical for video in near-total darkness. Secondly, you need a wide-angle lens, typically in the 14mm to 24mm range on a full-frame camera. This allows you to capture the vast scale of the aurora as it stretches across the sky and include some of the landscape for context and scale.
The Unshakeable Tripod
A sturdy tripod is absolutely essential. You will be using relatively slow shutter speeds, and any camera movement, even from the wind, will result in shaky, unusable footage. Don’t rely on a flimsy, lightweight travel tripod. Choose a robust model that can handle the weight of your camera and lens and remain stable in potentially windy conditions. A fluid video head is a great addition if you plan to introduce smooth panning or tilting movements, but a solid ball head will work perfectly for static shots.
Extra Batteries and Memory Cards
Cold weather is the enemy of battery life. The freezing temperatures common during aurora season can drain a fully charged battery in a fraction of the normal time. Always bring at least two or three spare batteries and keep them warm in an inside pocket of your jacket. Video files, especially 4K footage, are also enormous. Ensure you have several large, high-speed memory cards (e.g., 64GB or 128GB V60 or V90 rated cards) so you don’t run out of space during a spectacular display.
Core Camera Settings for Northern Lights Video
Balancing frame rate, shutter speed, aperture, and ISO is the key to technically sound aurora video. Unlike photography, these settings are more constrained and directly impact each other. Here’s a reliable starting point.
Frame Rate and Shutter Speed
For a cinematic look, set your frame rate to 24 frames per second (fps). To achieve natural-looking motion blur, videographers often follow the 180-degree shutter rule, which states your shutter speed should be double your frame rate. For 24fps, this would be 1/48s or 1/50s. This is a great starting point for a bright, fast-moving aurora. For a fainter, slower display, you may need to ‘break’ this rule and use a slower shutter speed like 1/30s or 1/25s to let in more light, but be aware this will create more motion blur.
Aperture (f-stop)
This is the easiest setting. You want to let in as much light as possible, so set your lens to its widest maximum aperture. If you have an f/1.8 lens, use f/1.8. If you have an f/2.8 lens, use f/2.8. This allows you to use the lowest possible ISO, which results in cleaner, less noisy footage. Some lenses are slightly soft when wide open, so you can consider stopping down by a tiny amount (e.g., from f/1.4 to f/1.6) for extra sharpness, but only if the aurora is bright enough to allow it.
ISO and White Balance
ISO controls the digital brightness of your video. With your aperture wide open and shutter speed set, ISO will be your main exposure control. Start with an ISO around 3200 or 6400 and adjust based on the aurora’s intensity. A bright, dynamic aurora might only need ISO 1600, while a faint one could require ISO 12800 or even higher. Be mindful that very high ISO values will introduce digital noise (grain). For color, do not use Auto White Balance. Set a manual Kelvin temperature, typically between 3200K and 4500K, to get a pleasing blue hour look for the night sky that renders the aurora’s green tones accurately.
Focusing in the Dark
Autofocus will not work in the dark. You must use manual focus. The best method is to find the brightest star or planet in the sky (or a very distant light on the horizon). Switch your camera to its live view mode and digitally magnify the view on that point of light. Carefully turn your lens’s focus ring until that light is as small and sharp as possible. Once you’ve nailed the focus, you can use a piece of gaffer tape to lock the focus ring in place so it doesn’t get bumped accidentally.
Quick Facts
- A camera with manual video controls and good high-ISO performance is essential.
- Use a wide-angle (14-24mm) lens with a fast aperture (f/2.8 or wider).
- A sturdy tripod is non-negotiable to prevent shaky footage.
- Start with these settings: 24fps, 1/50s shutter speed, widest aperture, and ISO 3200-6400.
- Always use manual focus; focus on a bright star using live view magnification.
- Cold drains batteries fast; bring multiple spares and keep them warm.
- Set a manual white balance (Kelvin 3200K-4500K) for accurate colors.
Frequently Asked Questions (FAQ)
Q: Can I film the Northern Lights with my phone? A: Yes, modern high-end smartphones (like recent iPhones or Google Pixels) can capture decent video of a bright aurora using their night modes. However, for the best quality, you will need a dedicated app that allows manual control over ISO and shutter speed, and you must use a tripod.
Q: What’s the difference between a timelapse and a real-time video? A: A timelapse is a series of still photos taken over a period and then stitched together to show movement. It’s great for very slow-moving auroras. A real-time video captures 24 (or more) frames every second, showing the fluid, true-speed dance of a fast-moving aurora, which a timelapse cannot replicate.
Q: How do I reduce noise in my aurora video? A: The best way to reduce noise is to capture the cleanest signal possible. Use a lens with a very wide aperture (like f/1.8 or f/1.4) to keep your ISO as low as possible. In post-production, you can use dedicated video noise-reduction software like Neat Video or the tools built into DaVinci Resolve or Adobe Premiere Pro.
Other Books
- B&H Photo Video – How to Shoot the Aurora Borealis in Video
- Sony Alpha Universe – See The Northern Lights In Real Time With These Pro Video Tips
- Lonely Speck – Ultimate Guide to Shooting the Milky Way (many principles apply)

Ganymede's Lopsided Sky
Summary
By the end of this article, you will understand how Jupiter’s largest moon, Ganymede, gets its thin atmosphere, and why its position in its orbit causes this atmosphere—and its auroras—to be strangely lopsided.
Quick Facts
- Surprise: Ganymede's atmosphere is primarily created by plasma from Jupiter crashing into its icy surface, a process called sputtering.
- Salient Idea: The oxygen atmosphere takes longer than one full orbit (~7 Earth days) to form, meaning its current state is a 'memory' of where it's been.
- Surprise: Jupiter's gravity, though weak at that distance, is strong enough to help shape Ganymede's long-lived oxygen exosphere.
- Surprise: The moon's 'afternoon' side is hotter, which enhances the sputtering process and contributes to a denser atmosphere at dusk.
The Discovery: Modeling a Moon in Motion
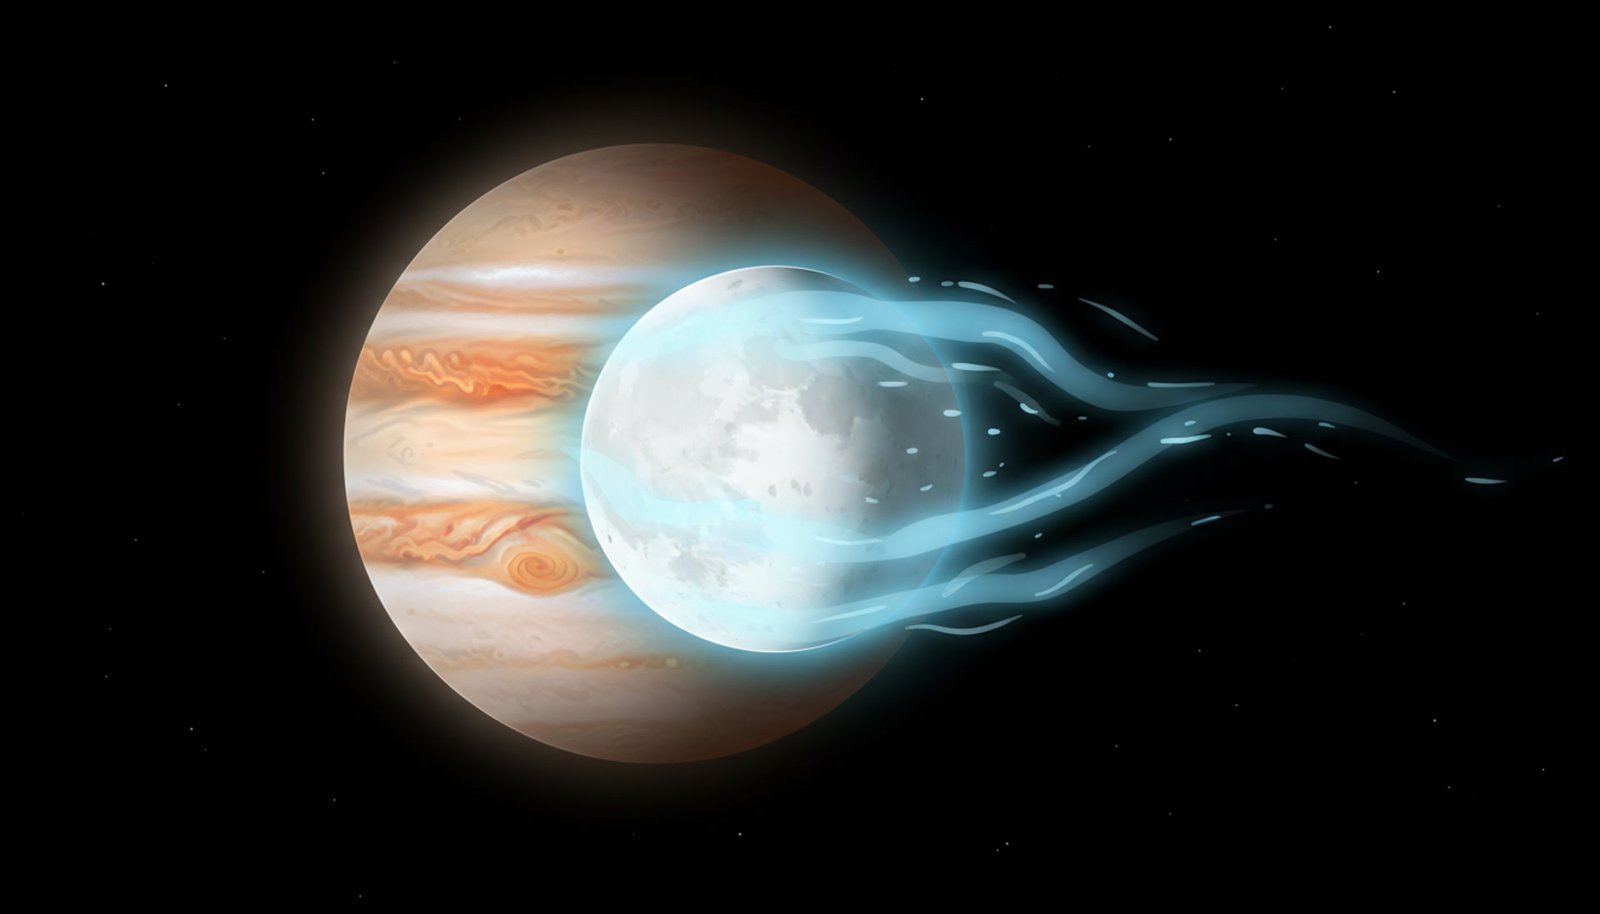
For years, scientists struggled to explain why Ganymede’s auroras, observed by the Hubble Space Telescope, were often brighter on one side. Static models of its atmosphere just didn’t fit. The Story of this breakthrough lies in a new approach: simulating Ganymede not as a stationary object, but as a moon in constant motion. Using a powerful 3D computer model called the Exospheric Global Model (EGM), researchers tracked millions of virtual water and oxygen particles as they were sputtered off the ice. They simulated Ganymede’s full 7.2-day orbit around Jupiter. The model revealed a Surprise: the oxygen atmosphere builds up so slowly that it creates a lag, bunching up on the dusk side. This simulated atmospheric asymmetry perfectly matched the lopsided auroras. It was the first model to show the atmosphere ‘breathes’ with its orbit.
Original Paper: ‘On the orbital variability of Ganymede’s atmosphere’ by F. Leblanc et al.
The O2 exosphere should peak at the equator with a systematic maximum at the dusk equator terminator.
— F. Leblanc et al.
The Science Explained Simply
Ganymede’s atmosphere is NOT like Earth’s, which is a thick, stable blanket created from within. To understand it, we must build a fence around the concept. Ganymede’s atmosphere is an ‘exosphere’, a near-vacuum where molecules are constantly being created and lost. Its source is external: a relentless sandblasting by energetic particles trapped in Jupiter’s immense magnetic field. This process, called sputtering, kicks water ice molecules off the surface. Some of these molecules are broken down into oxygen (O2). Because this process is ongoing, the atmosphere is more of a temporary halo than a permanent feature. The key difference is its origin: it’s a direct result of space weather, not geology.
Ganymede’s atmosphere is produced by radiative interactions with its surface, sourced by the Sun and the Jovian plasma.
— Abstract from the paper
The Aurora Connection
Ganymede is the only moon in our solar system with its own magnetic field. This creates a small magnetic bubble that shields it from some of Jupiter’s plasma. However, at the poles, this shield is open, allowing Jovian plasma to funnel down and strike the surface. This impact does two things at once: it creates the oxygen atmosphere through sputtering, and it excites that very same oxygen, causing it to glow. These are Ganymede’s auroras. This research shows that the observed asymmetry in the auroras—brighter on the dusk side—is a direct map of the lopsided oxygen atmosphere below. The auroras aren’t just pretty lights; they are a visual confirmation of the dynamic, orbiting ‘weather’ patterns in Ganymede’s exosphere.
A Peek Inside the Research
This discovery wasn’t made with a telescope alone; it required immense computational power. The team’s Knowledge and Tools centered on a 3D Monte Carlo simulation. This program acts like a virtual Ganymede, tracking the fate of millions of individual ‘test-particles’ representing different molecules. It calculated their ejection speed from sputtering, their trajectory under the pull of both Ganymede’s and Jupiter’s gravity, and even the tiny chance they would collide with each other. Simulating just 4.5 orbits took two weeks on 64 CPUs. This painstaking digital reconstruction was the only way to reveal the slow, lagging formation of the oxygen exosphere that happens over days—a process too subtle to capture in a single snapshot.
Key Takeaways
- A moon's atmosphere can be dynamic, changing its shape and density based on its orbit around a planet.
- Ganymede's personal magnetic field channels Jovian plasma to its poles, making them the primary source of its atmosphere.
- The slow-moving, heavy oxygen molecules are influenced by non-inertial forces, pushing them toward the equator.
- Observing a moon's aurora can reveal hidden asymmetries in its tenuous atmosphere.
Sources & Further Reading
Frequently Asked Questions
Q: Why is the atmosphere thicker on the ‘dusk’ side?
A: It’s a combination of factors. The surface is warmest in its local ‘afternoon’ (the dusk side), which makes the sputtering process more efficient. Furthermore, the heavy oxygen molecules take a very long time to spread out, so they tend to cluster in the region where they are most actively produced.
Q: Does Ganymede have weather?
A: Not like Earth. It’s far too thin for clouds or wind. However, its atmospheric density changes dramatically depending on where it is in its orbit and the time of day, which is a unique form of ‘space weather’.
Q: Why is Ganymede’s magnetic field so important for its atmosphere?
A: Ganymede’s magnetic field acts like a funnel. It guides the energetic plasma from Jupiter down to the polar regions. This focuses the sputtering process at the poles, making them the primary ‘source regions’ for the entire atmosphere.